Repurposing an old desktop PC into a 7L SFF for network application
- snowleopard8753
- Mar 23, 2024
- 3 min read
Updated: Mar 24, 2024
I received an old PC given by my friend, however, the Asus H81M-A motherboard seems to be defective. All components are leveraged from the old PC with the exception of H97 ITX motherboard, ITX casing and SFX power supply, I hope to revitalize the PC to serve as a router.
Processor | Intel i5-4690 4th generation, Haswell, LGA1150 with 4 cores 4 threads, TDP 84W |
Motherboard | Jginyue H97-iGaming mini-ITX motherboard with H97 chipset Internal: 4-phase VRM, PCIe x16, 4x SATA 3.0, 1x USB 2.0, 1x USB 3.0, M.2 NvME, M.2 for WiFI Rear: 1x HDMI, 1x DP, 1x VGA, 4x USB 2.0, 2x USB 3.0, Dual GbE |
RAM | 2x Kingston DIMM 4GB DDR3-1600Mhz CL9 Non-ECC 1.35V |
Storage | Lexar NS100 2.5" SATA3 512GB SSD |
Heatsink | ID-Cooling IS-47S low profile (47mm) height with 92mm fan heatsink cooler |
Network card | No brand 4-ports 2.5GbE based on Realtek RTL8125BG on PCIe 2.0 x4 (20Gbps bandwidth) |
Power supply | Thermaltake Toughpower 450W SFX 80+ GOLD full modular |
Casing | Rider R2 v3.0 ITX casing (135 x 193 x 270mm) / 7.0L |
Others | ADT PCIe 3.0 riser card 18cm |
Assembly steps
The disadvantage of buying a "no name / brand-less" items, more often than not, it doesn't come with any user manual. This is true for the mini-ITX motherboard and casing which took me a while to assemble it up.
Unscrew 1x screw to remove the black mesh cover
Unscrew 6x screws to remove the top panel
Unscrew 6x screws to remove the bottom panel
Remove the metal flute front panel
Affix the faceplate that comes with the motherboard into the case
Mount the mini-ITX motherboard into cage
Insert the PCIe riser card into the PCIe slot on the motherboard and route the cable behind the motherboard. Secure the female connector with 2x screws to the casing
Prepare the modular power supply - connect 24P cable for motherboard, 8P cable for CPU and 6P cable for SATA drive. All cables packaged together with the power supply.
Slot in the SFX power supply into the bottom of the case
Connect all the cables (e.g. USB, heatsink fan, ON/OFF switch, audio, SATA, power cables) into the headers and connectors on the motherboard.
Insert the network card into the PCI riser female connector and secure the card with an external tab (bundled together with the casing package)
Affix 4 case stand with 4 screws (bundled with the casing package) to the bottom panel.
Stick 4 rubber pads (bundled with the casing package) to the case stand
Screw 6x screws to assemble the bottom panel to the casing
Slot the font flute panel to the casing
Screw 6x screws to assemble the top panel to the casing
Screw 1x screw to assemble the mesh cover to the casing

Rear connectors of the mini-ITX motherboard which comes with HDMI, DP and dual GbE port

Mounted the old Intel i5-4690 Haswell CPU based on LGA1150 socket onto the motherboard

Mounted the ID-Cooling low profile heatsink with 92mm fan

Cramping everything in there and I'm not sure how I can I tidy up further. Fortunately, the power supply is a full modular type to avoid cramping even more cables in it.
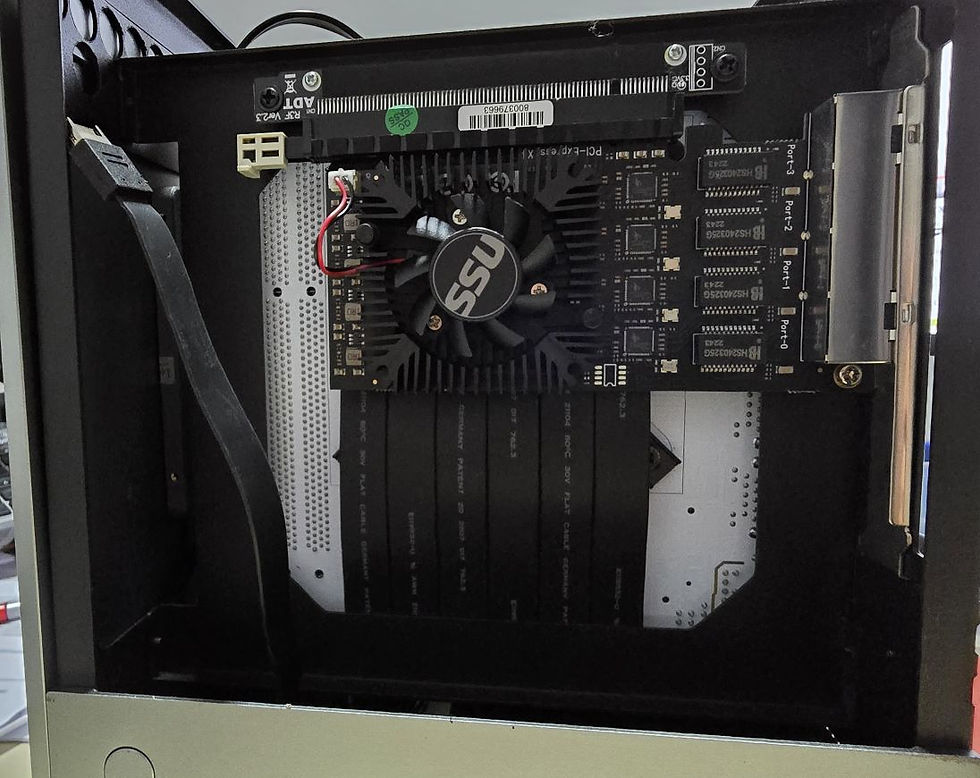
Other side of the case whereby the 4-ports 2.5GbE network card is installed via an 18cm riser card.

Metal front flute panel

2x USB 3.0 type-A ports and audio/mic jack

ON/OFF switch and type-C connector

6x ethernet port with 2x 1Gbps on the motherboard and 4x 2.5 Gbps via the Realtek network card

Bottom with case stands and rubber pads
Power consumption
The desktop PC has been installed with OPNSense and operating in an 230Vac environment.

With AC plug (230Vac) turn ON while the desktop is OFF, a standby power of 0.1W was observed

Turning on the desktop PC, a peak of 66.5W was observed

With no ethernet cables connected, an operating power of 27.3W was observed

After connecting a cable to the WAN port, the operating power increases to 28W

After connecting a cable to the LAN port (on top of WAN port connection), the operating power increases to 28.5W. As the operating power is non static due to various internal processes running behind the background, after 5 mins of observation, the power ranges between 28W ~ 35W
Thermal
After running OPNSense for about 30mins, below is the thermal snapshot gathered from the dashboard which is less than 50 degrees Celsius.

Recommended posts


Comments