How to install OPNSense from scratch
- snowleopard8753
- Mar 23, 2024
- 4 min read
Updated: Mar 27, 2024
We will perform a fresh installation of OPNSense into a repurposed desktop PC with 6 ethernet ports (2x 1GbE and 4x 2.5GbE) in a baremetal approach. To emulate a typical consumer like router you can get off the shelf, we will configure 1x WAN and 5x LAN.
For more information about the hardware used for this writeup, do visit an earlier post about the components chosen and the assembly process.
Steps overview
Download OPNSense and create a bootable drive
Installation
Initial wizard setup
Installation of drivers for Realtek network card
Adding, reassigning and enabling interface/network ports
Enabling DHCP and firewall settings for each interface
Preparation of installation USB thumb drive
Download OPNSense from https://opnsense.org/download/
Select the various options as shown below and click download.

Extract the image file with Winzip or WinRaR.

Download a software that create a bootable USB drive from an image file. Head over to https://rufus.ie/en/
Launch rufus and select the recently extracted img file as shown below:

Right at this point, you have completed the preparation of an installation thumb drive.
Installation
Power OFF your PC
Insert your thumb drive
Connect a keyboard to the desktop PC (optional - mouse)
Power ON your PC and press DEL key repeatedly until you get into the BIOS
Head over to the BOOT section and select the thumb drive as 1st priority to boot

Select "Yes" to exit the BIOS

Type "installer" for login ID and "opnsense" for password (without "" quotes)

Press Enter key to go with default

Select "Install <ZFS>" option using your down arrow key and press enter

Select "stripe" and press enter

Press spacebar key once to select "Lexar SSD NS100" and you should see an "*" next to it. Lastly, press enter key

Last confirmation before all data is wipe. Press enter key to proceed

Installation completed. Press down arrow key once and press enter key

After reboot, you should see the screen below. The default login as follow:
Login ID: root
Password: opnsense
At this moment, the Realtek network card is not working as the drivers have not been installed. As such, use the ethernet ports on the motherboard instead.
Congratulation ! You have successfully installed OPNSense!

Initial wizard setup
Head over to the default IP address @ 192.168.1.1 using your browser.

Click Next to continue

Click "Next" to continue

Choose your respective timezone and click Next

As my ISP is based on DHCP, thus, I left everything default and click Next

As I'm setting this OPNSense device in another network with an IP address @ 192.168.10.1, as such, I want to avoid a conflict with my existing network, thus, I have selected 192.168.18.1
After doing so, you have to login again at the new gateway IP @ 192.168.18.1

Set yourself a new password (default @ opensense)

Click Reload

Installation of drivers for Realtek network card
Using your browser, head over to 192.168.18.1 with your new password
Click Interfaces -> Assignments at the left column
From below, there's only 2 MAC address shown (belong to the onboard ethernet @ motherboard). The Realtek network with 4-ports are not shown as the drivers have not been installed.

Click System -> Firmware -> Plugins
Type "os-realtek-re"
Click on the "+" sign to install

The installation is complete

Click Power -> Reboot

Adding, reassigning and enabling interface/network ports
After reboot, with the new Realtek drivers installed, OPNSense may reassign the WAN & LAN port which you may need to do a little trial and error to identify which port has it been shifted to. In this case, the LAN port has shifted from the motherboard to the 1st port (nearest to the long metal tab) at the network card while the WAN port is simply next to the 1st.
Click Interfaces -> Assignments at the left column
Now, all the 6 MAC addresses (2 from motherboard and 4 from network card) appear for selection

Add the remaining 4 MAC addresses into the pool
Select the MAC address (description - optional) and click Add
Repeat the same steps for the remaining 3 MAC addresses

After adding all the MAC addresses into the interface pool (as shown below), click on Save

eth0 (WAN) and eth1 (LAN) are enabled by default during OPNSense installation
Enable 4 freshly added ethernet ports
Click on Interfaces -> [eth2]
check "Enable" box
Select "Static IPv4"
Set an IPv4 address - You cannot use the same as eth1 @ 192.168.18.1/24. Thus, you have to choose a different subnet which in this case @ 192.168.19.1/24
click "Save"
click "Apply changes" (not shown - at top right hand corner)
Repeat the same steps for the remaining 3 interfaces (eth3, eth4 and eth5)

After enabling all the interfaces and assigning IPv4 static addresses, Click Lobby -> Dashboard and you should see all the 6 interfaces displayed

Enabling DHCP service and firewall settings
Click Services -> ISC DHCP v4 -> eth2
Check "Enable" box, enter IP range, click Save and click restart icon (top right hand corner)
We start the IP range from 192.168.19.10 to reserve some IPs before 10 (e.g. 192.168.19.9) to support static IPs for some devices on the network.

Click Firewall -> Rules -> eth2 -> "+" icon
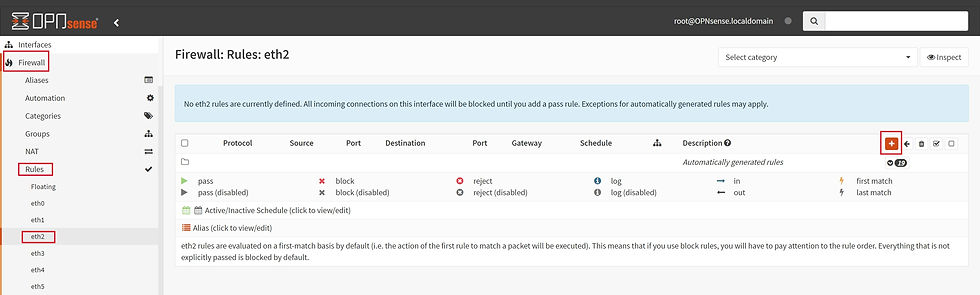
All settings @ default
Click Save

Click Apply changes for rules to take effect

Repeat the same steps (both DHCP & firewall) for eth3, eth4 and eth5
With the notebook connected to eth1/LAN, the gateway and IP are assigned correctly (192.168.18.xx) as shown below. Internet is working fine.

With the notebook connected to eth2/LAN, the gateway and IP are assigned correctly (192.168.19.xx) as shown below. Internet is working fine.

Recommended posts


Comments